Here is how to build your own DIY cleanroom using 3D printed parts that you can download or if you don’t have a 3D printer, you can buy them. It also requires a few other parts that are shown below. The overall goal of this project is to produce a class 10,000 cleanroom that you can build yourself.

The project started after seeing this air filter for sale without the vacuum. The current design uses Ridgid part #VF3500, but part #VF6000 is probably preferred since it is actually a HEPA filter. The only difference is the length of the filter and what size particles the filter removes.

The RadioShack Cooling Fan part #273-0241 seems to provide a reasonable airflow relative to the size of the filter.

Laboratory furniture can be expensive so one option is to build your workbench out of heavy duty shelving. I used the Workforce 5-Shelf Heavy Duty Steel Shelving from The Home Depot, 72 In. H x 48 In. W x 24 In. D Model #UR-245 Internet/Catalog #100095394 Store SKU # 351430. The Rivet Rack shelving from Tri-Boro Shelving seems to be a pretty good choice as well.

The shelving comes with 2’x4′ sheets of particle board, these will need to be reinforced with a variety of sizes of MDF. Choose your own thickness and paint the MDF with a hard enamel paint. Plan ahead because this step will take days, and the fumes are bad for you. So it turns out that the rivets used for the rivet rack style shelving are just about the same size as the head of a #8 wood screw.

So you can use the #8 wood screws to hang the MDF on the sides of the rivet rack. Hold the mdf in the desired position, mark the screw holes, drill starter holes and insert the screws.

The results are great and as an added bonus, hanging the MDF panels actually makes the shelving more stable.

You may want to mount your tools on the MDF while you have the drill handy.

The English language lacks words to properly describe the convenience of having your tools easily accessible and organized.

A rubber mallet is useful for “adjusting” the shelving components for proper fit.

Here you can see the pieces fitting together. The large hole is for the inlet fan and the smaller hole provides power to the workspace.

These wire organizers are awesome.

From below you can see how the power strip and task lighting are mounted. The florescent bulbs can be swapped out with black-light bulbs for extra science.

The lighting is operational and the work space is now mostly assembled.

Next we need to make the connecting rods to join the endcaps so they can hold the air filter in place. The connecting rods are cut from 6061-T6 Round Aluminum tubing, and will be tapped with M4 screws. The tubing has an outside diameter of 0.25″ and a wall thickness of 0.065″. The ones I needed were 119mm long, yours may not be.

Using whatever tools you have handy, drill the ends of the rods with a 3.3mm drill bit or a #30 drill bit. A lathe is a great tool for drilling the holes cleanly.

Next tap each end with an M4 tap. This is probably not the best way to do this, but it worked and thats what matters. Your luck may vary.

Attach the RadioShack fan to the MDF using #6 (or equivalent) wood screws.

Attach the open endcap to the fan using nuts and M3 screws with countersink heads, #4-40 screws can probably also be made to work.

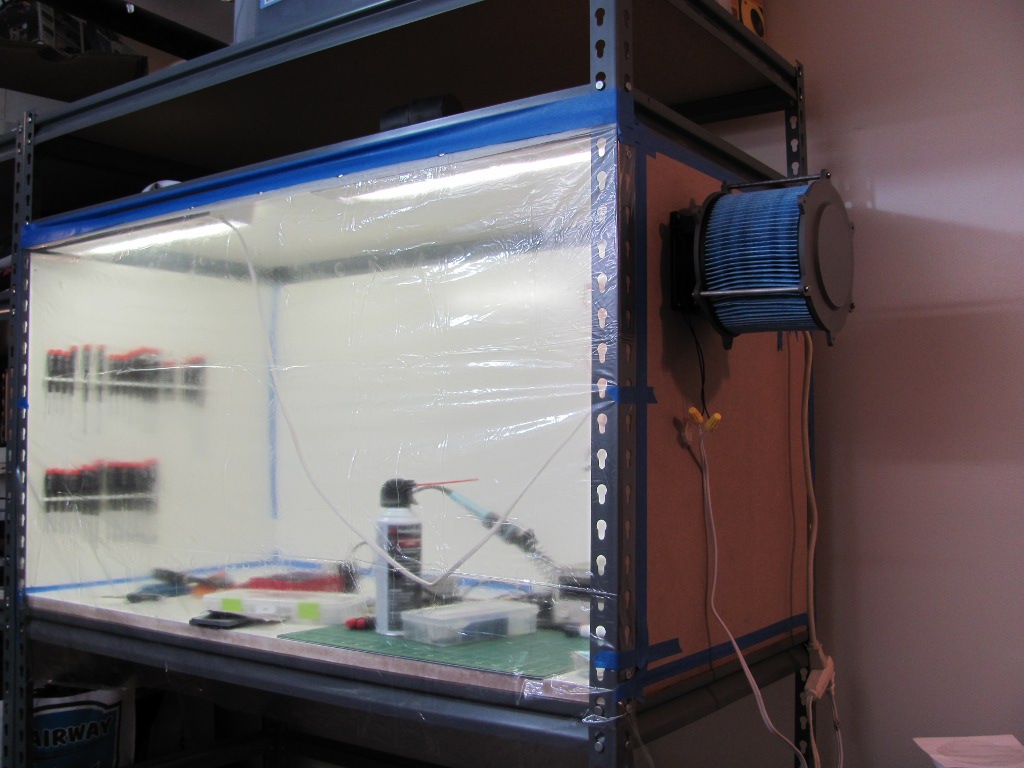
Cleanroom inlet fan is now installed. The fan creates a positive pressure inside the workspace with keeps dirty air from sneaking in. The filter should block dust and other small particles from entering. Further testing may show that a gasket is needed to ensure proper performance.

Next, find or buy an extra extension cord.

Chop off the end of the extension cord and strip the wires.

Connect the extension cord wire to the fan using wire nuts. If you are afraid of electricity or under 18 years old, find some who knows how to get electrocuted to help you.

Here is what the fan looks like from inside the work area. I should probably find some mesh to put over the hole at some point.

I used a clear plastic shower curtain to test things, but the shrink film for window insulation might work even better since it will be almost completely transparent. In this design you just reach under the curtain to perform science or extreme disassembly.

Here is the view from inside the “cleanroom”, looking out.

The shower curtain isn’t great but it looks usable in a pinch.
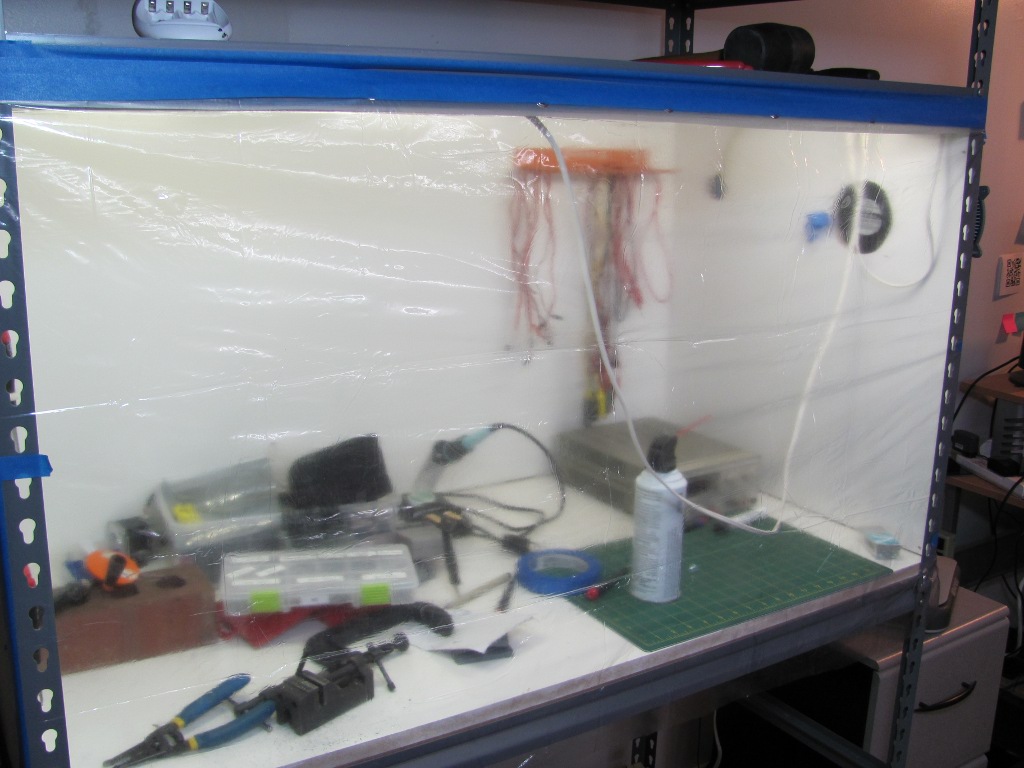
Blue painters tape seems like a good choice for temporarily sealing large gaps. Remember the clean room does not need to be air tight, it needs to have a positive pressure. So wherever there is a gap the air should be flowing out.
If anyone knows any easy ways to test the quality of cleanroom please let me know. So, now that the cleanroom workspace has been built, I wonder what it will be used for?

The easy way to measure the cleanliness of your setup is to use a particle counter, but one of those will probably set you back a kilobuck or more. You might be able to get a good deal on eBay, but it's probably still going to be expensive.
The cheap way would be to use a microscope to count particles that land on a piece of tape or agar coated dish. You'll want a control that you don't expose to anything. For a more quantitative measurement, get a known particle level sample that you could acquire from the local university's cleanroom with the help of a friendly student. There's also an ASTM standard for a similar technique: http://www.astm.org/Standards/E1216.htm
As far as your setup goes, there are a few things that will make it harder to reach a class 10,000 level: 1. that soldering iron will make a ton of particles from the flux smoldering. 2. the intake fan would be better placed outside the filter, pushing air in. Having the fan on the inside will increase the turbulent mixing of the air inside, reducing the effectiveness of pushing the contaminated air out. 3. The hardware should be in the most direct air flow from the filter possible. As the air flows past objects, it picks up contamination that it can transfer to other objects downstream. Putting the hardware next to the filter ensures it gets the cleanest air possible.
Thanks, this is some great information and insights.
I didn't even think to check ASTM for a DIY testing approach.
That's a really gorgeous flow hood! I want one!
Here's a fun biology-based method of testing your filter:
You're not using a HEPA filter, so bugs could still be getting in. If you're worried about particles of a similar size to microbes, then you can indirectly test for their presence by making some bacterial growth medium as an agar plate, sterilising it, and opening the plate in your clean hood after leaving the filter running for a few minutes.
I *just now* posted a method for making such sterile bacterial medium using only off-the-shelf ingredients and pressure cooking. You can find it here: http://letters.cunningprojects.com/?p=97
Leave the hood turned on for 5-10 minutes, and sterilise every surface inside with mild bleach to make sure it's your filter being tested, not debris from the MDF.
Then bring your presterilised LB Agar plate/dish inside, open it in the hood, and leave it for a minute. Then cover your plate with the sterile lid, then keep the plate somewhere warm but not hot and check it daily for the growth of bacterial colonies; they should appear as little mounds, rings or spidery growths on the surface of the agar.
If you get lots of growth, and you're sure the medium was properly sterilised beforehand (check by making several sterile plates and incubating one alongeside the test sample, unopened), then you've got lots of bugs coming in with your airflow. Anything similarly sized will be getting in also.
You can try this again with longer lengths of time open to the air, and you can measure the surface area of your plate against the time left open against the bacterial colonies that grew and do the math on how many biological agents are entering per second.
If you decide to test this method, let me know how it turns out! 🙂
Again, brilliant work with this hood, I hope it works!
I work for a scientific supply company stocking personal protective equipment in the cleanrooms of “the world's largest manufacturer of semiconductor chips.” I'm not actually allowed to use the company name. I may not be an expert in controlled environments, but I have learned a thing or two since I've worked there.
You're correct that positive pressure is very important. But airflow is just as important. Also, its going to be difficult to get the air really clean by constantly bringing in unfiltered air.
Ideally, you'd want something like this:
http://i518.photobucket.com/albums/u341/matthewlloyd/diy_bay.png
And, of course, the quality of the filters is key. But, this may be more than what you're looking for.
A few easy tips:
Wipe everything down with polyester rags using a solution of 6% IPA to 94% distilled water. This includes, the walls as well as anything you put in the clean space.
Where non-powdered, natural rubber latex gloves. If you're allergic, you can use plain, white, non-powdered nitrile gloves. Clean-packed gloves are gonna be way to expensive, so just wipe them down before you start your work.
Good job though! I've always thought about how you could do this DIY. Hope this helps!
Thanks, this feedback is great. I am going to try the petri dish idea to test the cleanroom after I have a chance to order the necessary lab equipment.
I have been trying to figure out how to get the airflow to recirculate in a way that is cheap and easy to build. The best I have come up with so far is to build a glovebox inside the current bench setup. I want to see how well things work now before I go to that effort.
I should probably try building some microfluidic devices at some point. I think I just need to order some PDMS and a vacuum desiccator.
Great article, I think it would be a great bench for DIY HDD repairs since maintaning the plates clean is key.
did you consider the option of implementing some kind of diy ionizer too??
Great work and thanks for posting it 🙂
Perhaps a smoke detector could be modified to make it sensitive enough to detect the air purity level that's required. Continually increasing the sensitivity to threshold as the air is filtered would allow you to detect if the best case scenario, or at least if the air becomes contaminated. I don't know how you would quantify that.
I built a similar project a while back and used the HYLLIS Shelving unit from IKEA; it was only $14.99. http://www.ikea.com/us/en/catalog/products/40103727
I like the rivet rack shelves, even though they are $80 each, because they can hold a considerable amount of weight and are very rigid and stable.
I would be concerned about a shelving unit that needs to be bolted to the wall, but $15 can't really be beat.
Keep in mind 'clean' is absence of particulates of any sort. Any opening is going to be an entry point for particulates, positive pressure or not. Probably the easiest design is a plexi flear faceplate with a couple of pieces of 6″ PVC pipe about 18-20″ apart going through it and a set of sandblasting (long sleeve) gloves on them so you never actually put your hands in the box, not do you put in a new set of gloves. Though if you wanted, you could put sterile latex/nitrile gloves on over the blasting gloves.
Before you seal the box, wipe everything down with the IPA/distilled water mix, then seal the box. Before placing anything in the box, blow it off with compressed air. Then pass it through an 'airlock' of some sort to keep external air from getting in. (actually, blow it off in the airlock, vent the airlock, wait and then pass it in)
Maximizing airflow through the box with big filters and lots of air. A single 80mm muffin fan isn't going to cut it. Anyone who has ever spent time in a clean room will tell you just how loud they are from all the moving air. Replace one of the end walls with a bank of fans and several layers of HEPA filter and you'll have the right idea. The outlet should be a single layer of HEPA style filter. (say, the other end if you want cross flow, which you do, so you don't get particulates trapped in eddy currents in the corners)
Make the sides out of melamine shelf material and you'll be on a good start. anything that has been painted is going to give off stuff for a long long while. (that's how it dries after all). Caulk all the joints, caulk the entry point for the electricity and anything else. Why? because, unless you plan on running the air system 24×7, the potential exists for things getting in via any hole.
Do all that and you can probably get down to class 10,000 pretty easily. Class 1,000 or less is going to be hard.
Bob – who spent waaaay too much time working in a class 1 clean room.
The current setup is certainly has some failing when compared to the actual cleanrooms I have been in. I am sure it is not good enough for nano fabrication yet, but it's a start.
The current fan is a 22Watt 120VAC fan and does 65CFM, so the airflow isn't that bad. I probably need to double or quadruple the number of fan/filters, but I want to measure my particle count first.
Not to mention using an actual HEPA filter, which is the same shape as the current filter only longer.
Also, I think a glovebox inside the current bench setup that recircuilates will be ideal.
My big concern for doing microfluidics is how I am going to get shop air to the vacuum desiccator.
Finally, it is clear that I need to setup my Armatron robot arm to manipulate things inside the chamber.
I'm not sure what you want to use the cleanroom setup for, but if you're thinking about microfluidics, there's a good chance you don't actually need a cleanroom. I TA an undergrad class on semiconductor fabrication techniques, and the challenge over the years has been to allow semiconductor fabrication using more or less bare bones equipment. We can actually fabricate working LEDs, diodes, and a few other devices with high success rates (most students get most of the devices working) in a non-cleanroom environment. One of these devices is a microfluidics device, and we're successful without a cleanroom.
Of course, the actual performance of these devices is terrible compared to what you can buy or fab in a real cleanroom, but it's good enough to show that things work.
Nice setup !
Try to manage the airflow to get out right after putting up dirt, so Id advice to do dirty jobs next to the air outlets going outside.
Compressed air inside the clean box is not desired, or at least give it a fast and easy way out after useage.
Two cat doors in series (with the “gray” room inbetween) would be great for cleaning off, packing, unpacking etc.
You'll find that the axial fan you are using doesn't push out diddly squat CFM wise with a serious filter in its way. Your 65CFM rating is at 0″ static pressure (no filter at all) and, with something even as insignificant as a furnace filter, is likely more around 20CFM (conjecture without seeing a spec sheet for the fan, but my point is axial fans suck for use with filters by default due to their design). What you should look for when you upgrade your filter is a squirrel cage fan which has the blades oriented parallel to the axle. Check out http://www.drillspot.com – they have spec sheets (including static pressure @ N CFM ratings) on the squirrel cage fans they stock which should give you a good idea for budget purposes. http://www.drillspot.com/hvacr/blowers/small-centrifugal-blowers/
With a serious filter like a MERV 15 you're going to be looking at an inch and a half or more of static pressure. So if you're looking to acheive 65CFM with a filter that beefy, you'd want to look at something like this: http://www.drillspot.com/products/139481/Itt_Jabsco-Par_Brand_34739-0010_Flange_Mount_Blower
Those blowers look pretty good, but I am planning on sticking with AC motors for efficiency and to keep things simpler. I'll have to look at some of their other models, maybe they have an AC blower that will fit the filters easily.
I should probably buy an anemometer so I can measure the airflow, but the ones I like cost too much. I'd build one but I'm already back logged on projects. Suggestions?
I wonder if I could get an air curtain to work for the front and ditch the plastic sheet.
http://en.wikipedia.org/wiki/Air_door
Instead of tubing with threads you can substitute all-thread rod and use a set of jammed nuts as the stop for the filter then a single locking nut on the outside. Pretty good setup for a basic cleanroom but you could also reverse the fan to draw up and through the filter for a soldering station (filter to draw smoke and flux residue) and a HEPA filter wouldnt be needed – you could even use a canister filter used in ShopVac units with a flat cap on the end for soldering, just something to catch the gunk from the smoke off the flux. I love those shelves, I have 4 of them for incoming and outgoing units for repair in my shop, very strong.
Come to think of it a similar setup with fan blowing out, even replaced with a bulk sized hose in place of the fan and filter, would be a good workstation for people that do power carving on wood, stone, glass, etc or use my thought on fan out with canister filter as an airbrushing station. Just being enclosed and having a flexible or plexiglass front with an inbound or outbound pattern makes this setup usable for many different purposes.
Using an air cycle machine or high velocity ventilation pump to feed a hanging ceiling made of a porous material to spread air flow over a large surface area would get it closer to a certain idea for dust suppression. Also useful as a heat exchanger-collector for warm indoor spaces and ceiling exposed to hot rook surfaces (for full-sized and living space applications – think energy recovery insulation plis ventilation.)
Take advantage of gravity and let particles fall down (noted in DIY bay graphic) to be captured by a recirculation fan-filter.
There needs to be an intentional vent (adjustable) to allow filth to flow in a designated direction. I recommend venting at the bottom rear, with recirculation fan/filter input pretty-near that vent. Adjust the intentional vent area with a piece of sheet metal on the high-pressure (inside) of the unit with slots for screws and wingnuts to secure. Adjust the vent area based on sound of straining fan motor (I'd go with a salvaged whole-house squirrelcage fan driven by a 1/4 horsepower electric motor) and anemometer indication. A couple of inches of water positive pressure is going to be enough to keep infiltrating particles out.
“I should probably buy an anemometer so I can measure the airflow, but the ones I like cost too much. I'd build one but I'm already back logged on projects. Suggestions?”
Clear plastic vinyl tubing made into a U-shape filled with food coloring and water will indicate internal pressure and magnitude. Relative pressure is measured in “inches of water” or “inches of mercury”. Don't use mercury for this application, because it's too valuable and a little bit hazardous. With one end of the clear tubing inside the cleanbox and the other outside, fluid level will be even with fans off. Mark the reference level. Turn the fan on and note the fluid move over the external fluid reference (positive pressure. If the fluid on the outside goes down, you have a negative pressure (something is backwards).
Welding gloves and an airlock (grey area) are good ideas that will help. Will you be able to clean the inside of the box while using the welding gloves and pass trash out of the airlock? Ability to clean & sterilize the outside of a container before passing it through the airlock?
If you are going to use volatile chemicals, unpleasant biologicals, or make nasty particles, venting through a filter to the outdoors might be a good idea. Metallized clothes drier ducting (4″ diameter) with a fan near the outlet might work.
Nano particles of things we might consider harmless are not harmless when aerosolized & ingested through the lungs. NATO 40mm thread chem warfare or mining filter mask might be a basic precaution. http://www.msanet.com/catalog/product16927.html
How do people use microscopes in a clean box? Video?
Cheers.
“Clear plastic vinyl tubing made into a U-shape filled with food coloring and water will indicate internal pressure and magnitude.”
The biggest problem with using a manometer or a digital pressure sensor is that it only measures pressure at a point. So you can only measure the flow speed at a point when what you need is flow speed integrated over the area of fan inlet divided by the area of the fan.
In terms of lab safety, about the most dangerous chemicals in my lab are acetone and ferric/cuprous chloride for making circuit boards. Though I'm planning on switching etchants to something more environmentally friendly once I use of the last of the ferric chloride.
I would be interested in hearing more about safety issues for handling carbon nanotubes.
Note to self: look up ASTM Standard E 2535-07
Most clean hoods do not recirculate their air. They are set up for laminar flow, and essentially push particles out with the force of the HEPA filtered air. 0.5 m/s (about 90 ft/s) is the typical velocity, and the class you can get with depends almost entirely on how you run the system, with an eye toward how many particles are generated inside the hood. The brand-new one we started up today is probably running at better than class 10 at the moment, because it's empty – once we've got a (gloved and gowned) operator sitting there doing actual work, it'll run about class 100.
If you're thinking about a biological safety cabinet, then you want to recirculate your air – but that's a whole different (and somewhat bigger) problem, making sure that the open front does not actually exhaust air into the room. If what you're after is low particle counts, you can skip recirculation entirely.
For class 1000 and up, typically you use a principle of dilution, rather than the mechanical removal of particles generated inside the room or hood. For a typical class 10,000 room, assuming a typical ratio of size to number of operators, you would look for a complete air change in the room every 30 to 90 seconds (depending on the specifics of the application and gowning protocols). For a hood, you can probably slide a bit on the air changes, since you don't have a whole operator inside the hood (and, in most cleanrooms, the operator is by far the dirtiest thing in the room!). In your design, I'd expect that your MDF is going to shed some particles even with the paint, and as others have pointed out the soldering iron is going to be good for some particles, but you can probably get the hood to class 10,000 without too much difficulty.
For particle counts, have you considered hiring a company that certifies cleanrooms? The guys that do ours charge something like $70 to certify a hood, and you end up with a good count from a calibrated instrument.
GOOD JOB. I work in cleanrooms over the last 20 odd years and have designed them, built them and have done a lot of testing on them for various things.
I work for a company that makes particle counters and cleanroom monitoring systems. I have seen 1000s of cleanrooms and clean benches.
I have also built cleanrooms and spaces using similar materials and construction methods, when the company at the time I was working with, did not have any budget but needed clean space.
Number one thing about a project like this.
1. Does it do what you need it to do?
It sounds like your getting level of cleanliness you need, but you might need to test it. You can rent a particle counter (or borrow one) from someone with one. (if your in the bay area I would be curious just to see how clean you can get.)
2. For get sealing the bench. That would be wrong, just make sure all the air thats incoming comes via the filter.
3. A dust controlled environment is easier than sterile. As your not making drugs, delete any comments about agar plates and bugs…
good tool,good imagine,the tool can make by P265GH
I want to thank your for posting your project. It was the inspiration for my own, based upon the Rigid VF6000 HEPA filter similar to yours. You can see it at http://pcbusinessguide.com/index.php?topic=85.msg258#msg258
I forgot to mention, a cheap particle counter available with 0.5 micron resolution is available from Dylos Corp for about $199 to $240 USD (latter includes PC interface). See http://www.dylosproducts.com/dc1100aqmc.html for mode info. I am not affiliated with them in any way.
There are so many things that I can do w/ this.
I'd use a plexiglass plate on the front, and extra long gloves if i were you…